 WhatsApp
Mastering Additive Mfg.
Your guide to understanding 3D printing technologies, selecting the right materials, and designing parts for perfect manufacturing.
How 3D Printing Works: FDM and SLA
A simple learning-first visual for the two most common 3D printing methods. First understand how filament printing builds strong functional parts, then how resin printing creates smoother high-detail parts.
FDM = melted plastic extruded by a nozzle.
SLA = liquid resin hardened by UV light.

Filament printing builds useful parts layer by layer
FDM starts with a spool of solid thermoplastic filament. The printer feeds that filament into a heated nozzle, melts it, and deposits it path by path until the full part is formed. It is one of the easiest 3D printing methods to understand because the material is physically laid down where the part needs to grow.
A plastic spool supplies the raw material and sends it into the printer as a solid strand.
Heat softens the plastic so the machine can place it exactly where each path and wall should go.
Each fresh line bonds to the one below it until the full three-dimensional shape is complete.
Prototypes, brackets, enclosures, jigs, holders, and many practical workshop parts.
Usually shows visible print lines, especially on curved surfaces and angled faces.
It is affordable, strong, material-friendly, and great for larger functional prints.
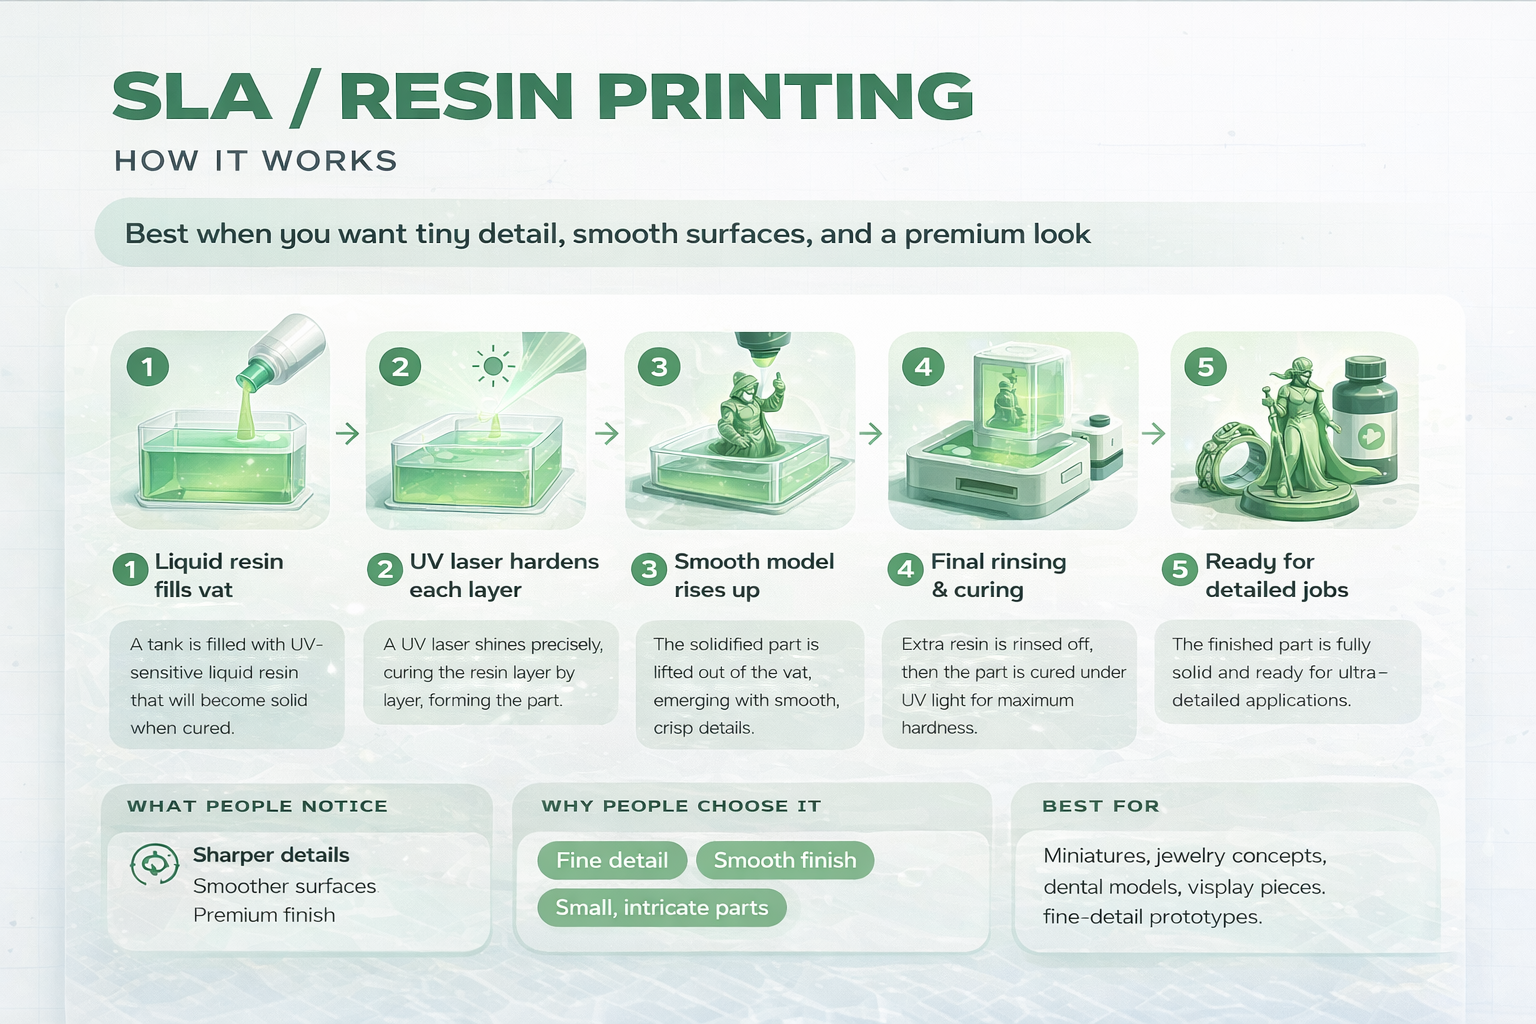
Resin printing creates smoother parts with finer detail
SLA begins with a vat of liquid photopolymer resin instead of a filament spool. A light source cures very thin layers of resin one at a time, which makes this process ideal when you want sharper details, cleaner edges, and a more polished visual finish.
The printer starts with liquid resin, which behaves very differently from solid filament.
Light hardens the resin in extremely thin sections, helping preserve fine textures and crisp features.
The result is typically smoother and more refined, which is why resin is chosen for detail-first parts.
Miniatures, display parts, dental models, jewelry concepts, and presentation-quality prototypes.
Smoother surfaces, sharper edges, and a more premium finish than standard FDM prints.
It captures tiny details well and produces a cleaner visual result for small intricate parts.
1. Core Technologies
FDM Printing
Fused Deposition Modeling melts and extrudes thermoplastic filament layer by layer. Best for rapid prototyping and cost-effective functional parts.
- Low cost for prototypes
- Strong functional materials
- Fast for bigger parts
- Easy material choices like PLA, PETG, ABS
- Visible layer lines on surface
SLA / Resin
Stereolithography uses an ultraviolet laser to cure liquid resin into hardened plastic. Ideal for extreme precision, smooth surfaces, and jewelry.
- Ultra smooth surface finish
- Extremely fine details
- Sharp corners and tiny features
- Great for display, dental, jewelry, miniatures
- Standard resin can be brittle
SLS Nylon
Selective Laser Sintering fuses nylon powder. Because the powder supports the part, complex geometries are possible without support structures.
- No supports needed
- Great for complex inner channels
- Tough and durable nylon parts
- Good for production-ready functional pieces
- Slightly grainy surface finish
2. Design for Manufacturing (DFM)
Designing for 3D printing is different from designing for CNC machining or injection molding. Follow these golden rules to ensure your parts print successfully and accurately.
The 45° Overhang Rule
For FDM printing, angles less than 45 degrees from the vertical can usually be printed without support structures. Anything flatter will require supports, which can leave marks on the surface.
Minimum Wall Thickness
To ensure structural integrity, keep walls at least 1.2mm thick for FDM, and 0.8mm for SLA/SLS. Walls thinner than this may fail to print or break during post-processing.
Holes & Clearances
3D printed holes tend to shrink slightly. Design holes 0.2mm to 0.4mm larger than the intended diameter. For moving interlocking parts, leave a 0.5mm clearance gap.
Escape Holes (SLA/SLS)
If designing a hollow part for Resin (SLA) or Nylon (SLS), you MUST include an escape hole (at least 3-5mm) to drain uncured resin or unsintered powder trapped inside.
3. Quick Material Guide
| Material | Technology | Key Characteristic | Best Used For |
|---|---|---|---|
| PLA | FDM | Stiff, easy to print, eco-friendly. Low heat resistance. | Visual models, form-testing, indoor parts. |
| ABS / ASA | FDM | Impact resistant, handles high temps (up to 85°C). | Automotive parts, outdoor enclosures, mechanical parts. |
| PETG | FDM | Chemical resistant, slight flexibility, highly durable. | Snap-fit joints, liquid containers, robotics. |
| Standard Resin | SLA | Extremely smooth, sharp edges. Brittle. | Miniatures, jewelry molds, highly detailed prototypes. |
| PA12 Nylon | SLS | Tough, wear-resistant, semi-flexible at thin walls. | End-use functional parts, living hinges, gears. |
Ready to test your design?
Upload your 3D CAD file for a free DFM review and instant quote.